Microsoft Server 2012 Dhcp Failover Setup
- 1 Comments!
Server 2. 01. 2 DHCP Server Role . Select Add Features in the pop- up window, then select Next. On the Features section, leave the defaults and select Next. Select Next on the DHCP Server window. Confirm the settings and changes on the Confirmation window, and select Install. After a couple of minutes, you should have your DHCP server role installed.
You might be required to restart the server after the installation. Configure DHCP Scope and Scope Options. Just because we have the role installed doesn’t mean we are done. We now need to configure the scope options. From the Server Manager window, select Tools and then DHCP to bring up the mmc. Now let’s create a new scope by right- clicking on IPv.
I cover the prerequisites, cluster installation, SQL Server setup, and Availability Group configuration all in one long post with screenshots.
What are the benefits of installing SQL Server on a Windows Failover Cluster? Learn about the strengths, weaknesses, and gotchas of clustering SQL Server. In this tutorial, we will implement one of Server 2012’s newest features, DHCP Failover. Before Server 2012, DHCP failover was achieved through Windows Failover. Windows Server 2012 R2 DHCP Failover services do not synchronise MAC Address Filters between partner servers System Requirements: Windows Server 2012 R2. How to setup DHCP on Windows Server 2012. Step-by-step tutorial to setup a Windows Server 2012 DHCP server. Step-by-step Installation of SQL Server 2016 on a Windows Server 2016 Failover Cluster - Part 3. So, we updated our DHCP Servers to 2012 R2. We setup DHCP Failover, which was easy to setup and seems very nice. But, we don't see our static reservations. The principles of DHCP are simple and Microsoft has not changed its core since before Windows NT days, however its not something you shouldn’t undertake lightly or.
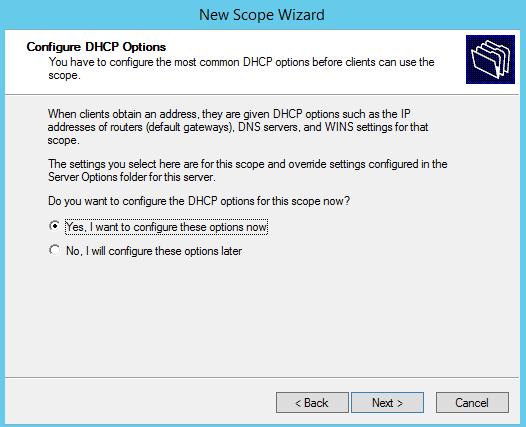
New Scope. Click Next in the New Scope Wizard winodw. Give your scope a name. This comes in handy if you assign different VLANs to different geographical locations (or whatever reason). For this tutorial, we will just name it notcreative scope. Then click Next. Now we need to tell this DHCP server what range of IP addresses we want it to hand out to DHCP clients. For this tutorial, we will be handing out IP addresses in the range of 1.
Fill in the Start and End range, then select Next. If you have any IP addresses within the scope range that you want/need to exclude, enter them in the Add Exclusions and Delay window, then select Next. For the Lease Duration, leave the defaults and select Next. The next window allows you to configure the scope options such as: The router (default gateway) we need to hand out. The DNS and WINS server address we need to hand out. Select Yes, I want to configure these options now, and then select Next. Input the router’s (Default Gateway) IP address, select Add, then select Next.
The next screen is where we input our DNS server IP address(es). For me, it was already auto filled in with my Windows Server 2. IP address, which is correct, so select Next. For WINS, input the same IP address, select Add, then select Next. Select Yes, I want to activate this scope now, and select Next. Then select Finish at the Completing the New Scope Wizard window.
Authorize DHCP Server. The final step is to authorize the server. Right- click your FQDN and select Authorize. Refresh the view by right- clicking your FQDN and selecting Refresh. You should now see greencheck marks next to IPv. IPv. 6. If you boot up a client that has DHCP enabled, you can see it within the Address Leases section. Expand IPv. 4, then Scope, then click on Address Leases.
You might have to right- click Adress Leases and select Refresh to see the changes.
How to Set Up SQL Server Denali Availability Groups. Before we get started, we need to talk about something. I’m going to be using the C word – that’s right, Clustering. Deep, calming breaths. We can do this, you and me. Along Came Polly Risk Software Implementation there. This isn’t the old- school clustering with shared disks, heartbeat networks, and hardware compatibility lists.
This is just another feature you’re going to add to your servers, click a few buttons, and move right on to more important things. What We’re Going To Build. My imaginary business in Chicago is running a mission- critical accounting application that need to be online at all times. We need to be able to tolerate the following problems: If the production server dies, I need to fail over automatically to a second server in the same Chicago datacenter. The business is okay with losing some data in the event of a failure that large, and they’re okay with this failover being a manual process. The BI team wants to run reports on the live database with as little delay as possible. They know they should be building a separate warehouse, but they’re too lazy busy, and they want this to work right now.
Backups need to run faster, and ideally, I don’t want to run backups on my main production server. To solve this, I’m going to implement four SQL Servers with Availability Groups.
The four servers will be: SQL2. PROD1 – the primary production SQL Server in Chicago. Data will be stored on a SAN.
SQL2. 01. 2PROD2 – the secondary production SQL Server in Chicago. It’s located in the next rack over, and it’s got all local storage so that we can tolerate a SAN failure without changing datacenters. We’ll be doing synchronous commits between SQL2.
PROD1 and SQL2. 01. How To Install A Screensaver Macintosh. PROD2, which means I do still need fast storage on #2 – a good fit for SSDs.
SQL2. 01. 2DR1 – an offsite SQL Server in Portland. Because the business is okay with some data loss in the event of a complete Chicago datacenter failure, we’ll be doing asynchronous commits to this server. SQL2. 01. 2RPT1 – a read- only SQL Server in Chicago. It can be on any storage (SAN or local). We’ll be doing asynchronous commits here, which means we might be running 5- 6. BI team’s reports.
After hours, when users aren’t running reports, we’ll run full backups from this server. Now let’s get started building these four servers. Prerequisites: Before We Install SQL Server 2. I’m using four Windows Server 2. R2 Enterprise servers in this tutorial, but you can use as few as two. I strongly recommend using the same drive letters across all servers: for example, if you want to use E for apps, F for data, and G for logs, then all four servers need to use those same drive letters. If the production server has an H drive that no other server has, and we add a data file on the H drive, then that alter- database statement will fail across the rest of our servers – instantly marking their databases as suspect.
We can fix that by restoring files to the other servers manually, but the whole point of our solution is to make it easy and automatic, so keep those drive letters identical from the start. Windows Enterprise is required due to the clustering features, but they don’t have to be beefy machines – in my lab, I’m using VMs with 2.
GB of RAM. Each server needs the . NET Framework 3. 5. Failover Clustering feature already installed. To install these features, go into Server Manager, Features, and click Add Feature. In the Add Features wizard, check the boxes for . NET Framework 3. 5.
Failover Clustering: Adding the Features. After those two features are installed on all of our servers, we need to configure the cluster. Go into Control Panel, Administrative Tools, Failover Cluster Manager. Click Validate a Configuration, and enter the names for your SQL Servers. Validate a Configuration Wizard. Note that all four of my servers are in the same domain.
You can’t use servers in different AD forests here. Click Next through the wizard, and you’ll be asked what tests you want to run. I run all tests every time, but technically, you could skip the storage tests if you’re only using Availability Groups.
These servers will not be sharing storage, so I don’t need to test whether any of them can see each others’ drives. If you run all tests, you’ll see warnings in the Storage section: Of course, I *would* fail at storage.
That's so me. Whether you pass or fail, click the View Report button to get more insight on your servers. A detailed HTML report pops up to give you the skinny: Network Warnings. The Network section of validation is giving me warnings because I’ve got a few single points of failure. Each of my servers only has one network card and no network teaming. If a network card went bad, if someone tripped over a patch cable, or if somebody assigned an IP address that duplicated my SQL Server’s, then whammo, one of my nodes would go down. In a real production environment, you’d want to address these issues. If you got errors that you want to change, go fix them and rerun validation.
Otherwise, if you don’t see any showstopper errors, close the validation report and click the “Create the cluster now using the validated nodes” link. Creating The Cluster.
The Create Cluster Wizard will ask for the new cluster’s name, IP address, and network. The cluster is like a virtual server that doesn’t really exist, but just gets passed around from server to server depending on who’s in charge. You remember that time at the restaurant when you found a hair in your bacon, and the waiter said it looked an awful lot like yours? And then you stood up and asked for the manager? You didn’t know what the manager’s exact name was, because the manager changes all the time from shift to shift over at Harry’s Bacon Shack, so you just asked for the manager. Some guy came over with a nametag that said “Manager On Duty.” Well, that’s exactly what we’re creating here – a manager- on- duty nametag.
Cluster Name and IP Address. The cluster’s name is not the name of the SQL Server. That’s a really important distinction to remember. A restaurant might have a lot of waiters, but it only has one manager.
Your cluster may end up with several different instances of SQL Server down the road, but there’s only one manager resource for the cluster. The manager is the one you call when there’s a problem with your waiter.
If SQL Server is serving us flies in our database, we’re going to call the manager. The rest of the time, we can pretty much forget that the manager even exists. In my example, I’m naming my cluster SQL2. Cluster. 1. I’m only naming it that because all of my machines are named SQL2.
Your naming scheme may vary, but I just wanna drive that point home that the cluster name doesn’t really have anything to do with SQL Server. After the wizard finishes, Failover Cluster Manager will show our newly created cluster with four nodes, a network, and no services or applications. What a Cluster. Yes, installing the Failover Clustering feature really is as easy as checking a box and clicking next- next- next. Now, don’t get me wrong, we’re going to have a few more things to do down the road, but take a moment here to appreciate just how far Windows has come in the last ten years.
Next: The SQL Server 2. Setup. Download SQL Server 2. Evaluation Edition and start the setup on one of the Windows machines.
The very first screen in setup is just a little tricky because it offers one link for “New SQL Server stand- alone installation” and another for “New SQL Server failover cluster installation.” The one you want is stand- alone. You can indeed do clustering with 2.
Availability Groups by themselves. Installation Choices. In the Setup Role step, choose SQL Server Feature Installation. In the Feature Selection step, the only feature you absolutely need is Database Engine, but here’s what I choose for lab boxes: The Usual Suspects. In real life, I wouldn’t include Distributed Replay on my production servers, but in a 2.
Distributed Replay holds the promise of making load testing easier.